• Skip to primary navigation
  • Skip to main content
  • Skip to primary sidebar
  • Skip to footer

Among Brenda's Quilts & Bags

Patterns Designed by Brenda Miller

  • Browse Patterns
  • Shop Now
  • Visit ABQ Sewing Studio
    • Visit Our Strathroy Store
    • Sewing Classes at ABQ in Strathroy, Ontario
    • Class Calendar
    • Baby Lock Sewing Machines
    • Sewing Machine Service and Repairs
    • Quilting Machine Certification and Hourly Rental
  • Sewing and Quilting Activities
    • Free Resources for Newsletter Subscribers
    • All Activities
    • Sewing Classes, Workshops, Presentations
    • Show ‘n Tell: Your Finished Projects
    • Free Patterns
    • Sewing Tips
    • Guide to Sewing Machine Feet
    • How To Choose a Sewing Machine
  • About
  • Sew Wonderful Blog
  • Contact Us
  • Wholesale Buyers: Start Here

Hand Quilting? Put A Quilter’s Knot On The End of Your Thread

Like this? Share it!

Tie a quilter’s knot on the end of your thread and sink it into your fabric so you can’t see it

I don’t know what it is about this simple quilter’s knot but it seems to impress others whenever I demonstrate it.

Find more tutorials and videos at Make Bags With Brenda

I use this technique whenever I start off hand quilting or appliqué stitching. The knot is very much like the French knot used in embroidery.

We’ve added video, but you may also follow my husband Rob’s diagram for the quilter’s knot below. (Yes, even he can do it! But he drew the diagram because he only quilts about once a year, and keeps forgetting the simplest things like this knot…) His diagram shows how the knot is used in hand quilting to begin and end the thread by hiding the knots in the quilt batt.

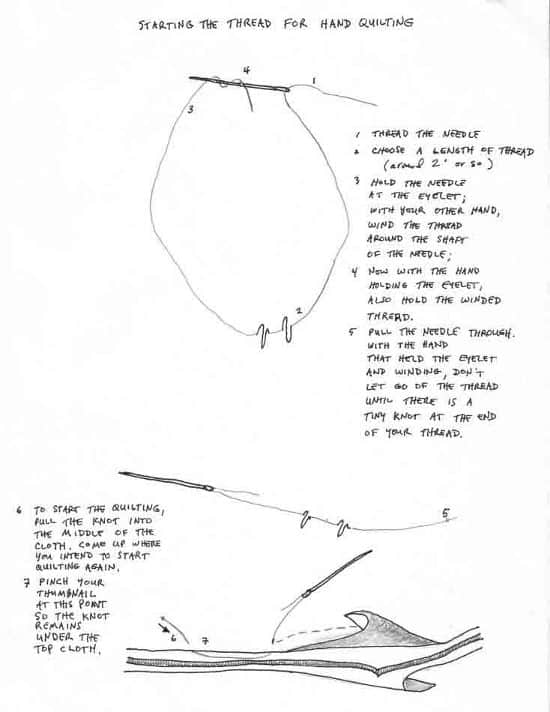
Starting the thread for hand quilting

  1. Thread the needle.
  2. Choose a length of thread (around 2″ or so).
  3. Hold the needle at the eyelet; with your other hand, wind the thread around the shaft of the needle.
  4. Now, with the hand holding the eyelet, also hold the winded thread.
  5. Pull the needle through with the hand that held the eyelet and winding; don’t leet go of the thread until there is a tiny knot at the end of your thread.
  6. To start the quilting, pull the knot into the middle of the cloth. come up where you intend to start quilting again.
  7. Pinch your thumbnail at this point so the knot remains under the top cloth.


Like this? Share it!

Filed Under: Sewing Tips Tagged With: Tutorials

Previous Post: « Olde Crow Primitives Shop
Next Post: Bag Sewing Class and ‘Developing the Designer In You’ Lecture in Leamington »

Reader Interactions

Comments

  1. USAgala says

    June 2, 2018 at 6:12 pm

    Esercizio fisico riduce il rischio cardiaco in obesi le donne. l’elenco dei legumi.

    Reply
  2. Annzie says

    April 16, 2021 at 10:45 am

    Very nice! Thanks for sharing. I’m trying me hand at quilt stitching for the first time. I appreciate your sharing!

    Reply
  3. Dianne Newham says

    January 28, 2022 at 4:32 am

    I still don’t get it, I have watched 25 videos and this one plus the diagram and I can not figure out how to do it.

    Reply
    • Wanda says

      April 8, 2022 at 11:25 am

      I heard you, DianneN. Hang in there. I almost gave up this morning after just 3 videos. So impossible to see what’s going on underneath someone’s fingers, no? I love Rob’s handwritten diagram above.

      For me, part of it was relaxing a bit which happened after reading the intro to this instructional article written by an avid quilter who’d struggled for years to learn the quilter’s knot. Fwiw: http://www.patchworkposse.com/quilters-knot-tutorial/

      Reply
    • Nancy says

      June 12, 2024 at 11:59 am

      Maybe because her hand covers the camera, you can’t see it.

      Reply
  4. https://www.cucumber7.com/ says

    March 31, 2025 at 8:41 am

    Good day! I know this is kinda off topic but I was wondering if you knew where I
    could locate a captcha plugin for my comment form? I’m using the same blog platform
    as yours and I’m having problems finding one?
    Thanks a lot!

    Also visit my web page https://www.cucumber7.com/

    Reply
  5. https://www.cucumber7.com/ says

    March 31, 2025 at 9:23 am

    Incredible story there. What happened after? Good luck!

    Visit my blog post – https://www.cucumber7.com/

    Reply

Leave a Reply Cancel reply

Your email address will not be published. Required fields are marked *

This site uses Akismet to reduce spam. Learn how your comment data is processed.

Primary Sidebar

Newsletter Signup

Sewing & Quilting Activities

  • Show ‘n Tell
  • Quilt Guilds
  • Round Robin Quilt Project For Guilds or Groups
  • Why do we care about quilting and sewing?

Trips to China and Canadian Quilts in Taiwan

  • Taiwan Art Quilt Society Show
  • Travel to China

Footer

ABQ Store

Shop Online

Make and Share

  • Show ‘n Tell
  • Quilt Guilds
  • Round Robin Quilt Project For Guilds or Groups
  • Why do we care about quilting and sewing?

Travels

  • Taiwan Art Quilt Society Show
  • Travel to China

Tutorials, Classes & More

  • Class Calendar
  • About Classes at ABQ Sewing Studio
  • Sewing Tips
  • Online Tutorials and Classes at Make Bags With Brenda
  • About Live Classes, Workshops, and Presentations

Pattern Designs

  • Bag Patterns
  • Party | Picnic | Home Patterns
  • Quilt Patterns
  • ABQ Bag Zippers

ABQ Sewing Studio

Visit in person

  • Classes at ABQ Sewing Studio
  • Sewing Machine Service and Repairs
  • Authorized Retailer for Baby Lock Sewing Machines
  • Quilting Machine Certification and Hourly Rental

Wholesale Buyers

  • Wholesale Buyers Information

Sew Wonderful Blog

  • Pattern Musings
  • Places
  • Sew Wonderful
  • Reflections

Follow us

Using This Site

  • Contact Us
  • Privacy Policy
  • Terms

About Us

  • About Brenda Miller
  • About Among Brenda’s Quilts & Bags
  • ABQ Sewing Studio

Copyright © 2025 Among Brenda's Quilts

We use cookies to ensure that we give you the best experience on our website. If you continue to use this site we will assume that you are happy with it.OkRead our privacy policy