Updated September 2017
I’ve been a Canadian ambassador for Baby Lock Sewing Machines for several years now, and over that time I’ve used a variety of their sewing machine models.
Currently I use the Unity, but let’s flash back to mid 2012 when I received my first sewing machine to test.
My First Baby Lock Sewing Machine: The Ellisimo Gold
Welcome Home Baby!
July 9, 2012

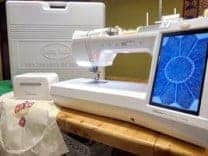
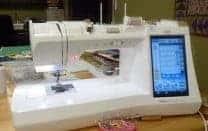
I’m pleased to announce that I am now a Baby Lock ambassador here in Canada. For a year I will be using Baby Lock’s Ellisimo Gold sewing and embroidery machine and will be posting my experiences here for you to follow. Perhaps you are considering buying a new sewing machine, maybe you have a Baby Lock and have not used it to it’s full capacity. Follow and me as I use the machine and learn all about what Baby Lock can do for you! Here is a picture of the new machine. It’s quite a bit larger than what I have been used to in the past (my old Pfaff 2020) and it has all the bells and whistles. I’ll be back tomorrow to tell you more…
Get detailed information on the Ellisimo machine.
Taking Baby Steps
July 11, 2012

This blog follows me as I get to know my new Ellisimo Gold sewing machine by Baby Lock.
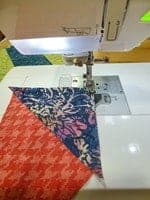
Today I’ve been working at making a pattern sample for a quilt using the Baby Lock. I’ve decided to do some piecing before I tackle learning the embroidery process. Wouldn’t you agree, it’s always a good idea to learn the basics before delving into the totally unknown? In my case the unknown is the extensive embroidery capabilities of this machine. Yes, I’ll admit it I have never used an embroidery machine before. But that’s the beauty of this blog – you’ll be able to relate if you are a novice too!
After familiarizing myself with the machine by working through the basics in the workbook I’ve started my piecing. I’ve got to get a new design out the door for a quilting magazine so this is the perfect opportunity to give the machine a workout.
I’m using a 1/4″ piecing foot. This foot is not a part of the machine’s accessory kit. I was advised that the standard ‘J’ foot would give me a 1/4″ seam, but I’ve found that it’s about 1/16th of an inch shy. The 1/4″ foot I obtained from my Baby Lock rep. Betty works perfectly. I like the slim-line style of this foot and notice that it has markings for pivoting so you can sew a perfect 90 degree corner.
A feature that I’ve never enjoyed before is the machine’s instant threading capability. There is also an extra spool pin so that you can wind a bobbin from another spool without re-threading the machine. I find that very handy. The presser foot automatically detects the thickness of the fabric so that the fabric is fed very smoothly as you sew. The machine has a large well lit work area. At Baby Lock they call it stadium lighting. I’ve never been in a stadium before but it sure is nice and bright!
Catch up with me tomorrow when I’m going to tell you about all the nifty time saving operation buttons on the front of the Ellisimo Gold. You’ll be amazed at what they can do for you.
Peerless Piecing
July 12, 2012

This blog follows me as I get to know my new Ellisimo Gold sewing machine by Baby Lock.
Today I’ve been piecing a new quilt which must be submitted ASAP to a quilting magazine for photography. The new Ellisimo machine has been whirring away all day as I hurriedly try to get it done.
When piecing I always try to do my best by pinning carefully and sewing with great care, but even so every quilt I make has some points that need adjustment and some seams that have to be picked out and lined up properly. I’ve never thought much about it before today because hey, reverse sewing is just part of the process right?Well guess what I learned today? Throw away the seam ripper gals because reverse sewing is practically a thing of the past with this machine. I have made 3/4 of a quilt today and have only had to tweak two little seams. And those two areas had been pinned incorrectly. There are plenty of points, and areas where opposing seams align at 45 degree angles on my quilt. I know that my pinning abilities and sewing skills have not changed since last week, only my machine has. Quite frankly I am happily amazed!
I know I promised to tell you about the operation buttons on the machine today but that will have to wait till my next post. I just can’t get over the accuracy of this machine!
Beam me aboard Scotty OR Button, button, who’s got the button?
July 24, 2012

Today, I’m going to talk about the operation buttons on the Ellisimo Gold machine by Baby Lock. I’m quite intrigued by all the things these buttons can do. In case you are just joining this blog space, I’m a Baby Lock Ambassador, brand new to this machine so join me as I explore all its features.
Beginning from left to right in the photo you’ll see the Start/Stop button. It’s lit up in green. I think of this as the LAUNCH button on my supersonic new machine. A quick press and your machine will automatically sew a few stitches very slowly before zooming away at your regular speed. Your speed is set on another button – the 6th from the left. Sliding it to the right gives you more speed, sliding it to the left slows it down. I’ve decided that I like it right about in the middle.
Our second button is the Reverse, or the ‘whoops I better reinforce that seam’ button. When you press this little baby you’ll get 3 stitches sewn, one right on top of the other. This is a great when you don’t want to have reverse stitches showing. If you hold the button down you’ll be sewing stitches in reverse until you take your finger off the button.
Move over to the next button on the right to find the Needle Position button. Now you might think that this button just allows you lower or raise your needle but no, that’s not all folks… Press it a couple of times to make a single stitch. Sometimes you need that kind of control in a tight corner. We’ve all been there so you know exactly what I mean!
Next in the lineup is the Thread Cutter button. Boy have I been missing out not having this. Press this magic button and presto the tail end of thread on your seam has disappeared. Not only will you save vast gobs of thread but you’ll no longer have a floor that looks like you spilled a bowl of multi colored vermicelli noodles all over it.
The Presser Foot button is pretty cool. You’ve got the power with this button to raise, lower, raise and lower, lower and raise your presser foot. I’ll bet you can tell how much I love to raise and lower this foot, right? This machine also has a knee lifter allowing your knee to controls the raising and lowering of the presser foot. That leaves your hands free to move the fabric around any way you like.
Passing over our Sewing Speed Controller, ‘cause we already talked about it, we come to my favorite button of all —– the Automatic Threading button. Omigosh, this one actually, really and truly, threads your needle. It doesn’t just thread your needle once in a while when it’s feeling up to it, it threads it every time! All of you four eyed, bifocally challenged sewers, and those of us who are just in a hurry will appreciate this button. And remember this button eliminates the need to trim thread at the beginning of your seam. Less vermicelli on the floor again girls!3
Zip-A-Dee-Doo-Da or Embroidery Step by Step
July 25, 2012

The time has come to be brave and try out a bit of embroidery on my new Ellisimo™ Gold sewing machine by Baby Lock. In case you are just joining this blog I’ve the use of this machine for a year to try it out. My ultimate goal is to draw my own embroidery designs and to digitize them for quilting patterns. But I’m still a baby on my Baby Lock – just learning to take my first steps!
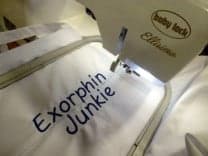
My husband Rob has his own blog. He’s an amateur whole grain bread baker. His blog is called Exorphin Junkie. Endorphins are the molecules in bread that give you such a sense of satisfaction. Try to give up bread for a while and you’ll feel those exorphins calling you back to eat bread again! Rob has asked me to embroider his blog name on one of his baker’s aprons.
So, with manual in hand I begin…. My Baby Lock representative Betty spent a couple of hours with me when she dropped off my machine showing me the ropes. I’m not a true fish out of water, although I do feel a little bit of apprehension. I guess that’s normal when you try something new! Attaching the embroidery foot and the flat bed attachment to the machine is straightforward when using the manual. I notice that it’s recommended that I use a 90/14 needle. I’ve got one of those. I’ve decided to use the largest hoop today. It measures 8″ x 12″.
Then it’s on to selecting my embroidery pattern. I’m using an alphabet and there are a number of fonts available that are perfect for a masculine look. There are also several floral lettering styles to choose from as well as lots of pretty pictorial designs. Better not go there for this project! I press the key that looks most appropriate. I think it’s the comic sans or architect font but I’m not sure since the font name is not given on the screen.
The next screen that appears gives me a little keyboard to type in the lettering. I type in the word Exorphin. Hmm, the word is too long to fit along the 8″ side. A window pops up with a crying baby. Betty has told me this little character is called the sad baby. Sad baby tells me I’m not going to get my way, but will need to rotate my word so that it fits. I press the handy rotate button that has automatically popped up alongside the sad baby. Super, my word fits!
I’d like to include the word Junkie on this same line. But my line is full with the first word. How do I move to the next line so that Junkie appears below Exorphin? After a bit of head scratching and searching I find a button called Set. Pressing this sets the first word Exorphin and allows me to press the Add button to type in the word Junkie. The word Junkie also needs to be rotated because it appears on the screen crossing over the word Exorphin. I press set, press rotate 90 degrees and move the word Junkie down using the arrow button. Now it is under the word Exorphin. I’m feeling like I get it now, actually everything is very intuitive. My lettering layout looks good so I press Reset. Now it’s time to sew the pattern. Pressing the button called Sew I see that the lettering will take 10 minutes to complete.
I have to prepare my fabric before I place it in the hoop. I was given a package of Sulky™Sticky Fabri-Solvy at Quilt Market last fall. I’ll use it. I peel the backing off the 8″ x 12″ sheet and stick it to the back of my apron. This lettering needs to be centered on my apron so I draw registration lines on the apron with a Frixion™ erasable marker. I will be able to iron these marks off when the project is complete. I use the clear grid sheets included with my machine to center my lines on the apron to the center of the hoop. This is all really easy to do. The hoops get put together, the apron is stretched taut and I’m ready to go. The hoop slips easily onto the flat bed attachment. I slide a large piece of tear away stabilizer between the bottom of the hoop and the bed of the machine.
The machine comes with a package of stickers that look like a snowman in the cross hairs of a rifle. Better watch out snowman! I stick this little sticker at the crossed registration marks I’ve drawn on my apron. Pressing scan causes the machine to center to the snowman sticker. The needle is poised and ready. The sticker is removed – whew the snowman has been saved!
Time to press the start button on the front of my machine – we talked about that button in our last post. And presto after 10 minutes and one re-threading of the needle (no problem at all) I have my finished apron.
I feel like a million bucks, like I climbed Mount Everest, like anything’s possible! Follow me as I continue my embroidery journey on the Ellisimo Baby Lock™. I’m off on a family camping trip for a bit but will be back soon – Brenda4
The Ellisimo is Humming!
October 9, 2012

It’s quilt show time again and that means the push is on for new quilt patterns to take to these events. This month is extremely busy with CreativFestival in Toronto and Quilt Market in Houston.
The Ellisimo has been doing a fabulous job for me and is featured in my video Piccadilly Piecing. See the superb work it has done for me and what it can do for you!
More Baby Lock Sewing Machines
My next sewing machine was the Unity, and I also gave the Tiara II a whirl.
Wish my experience with Babylock was positive. My 2000.00 dollar Espire Quilters Dream died for the first time when it was 3. Over the next 5 years it died 4 more times. It has been fixed now 4 times and has been at repair shop this time for 3 months. No one has been able to fix it. The limited 25 year waranty is limited to pretty much nothing. My next machine will be a Janome. Oh and the handle snapped in the middle not where it joins the machine. I will paint it yellow and take it to my quilting guild. Oh right it is being fixed again.
Hi Eleanor,
What a disappointment for you. I have a friend with a high-end Pfaff with similar problems. Personally, I”ve never had any service requirements but there are always sad exceptions. Best of luck in future.