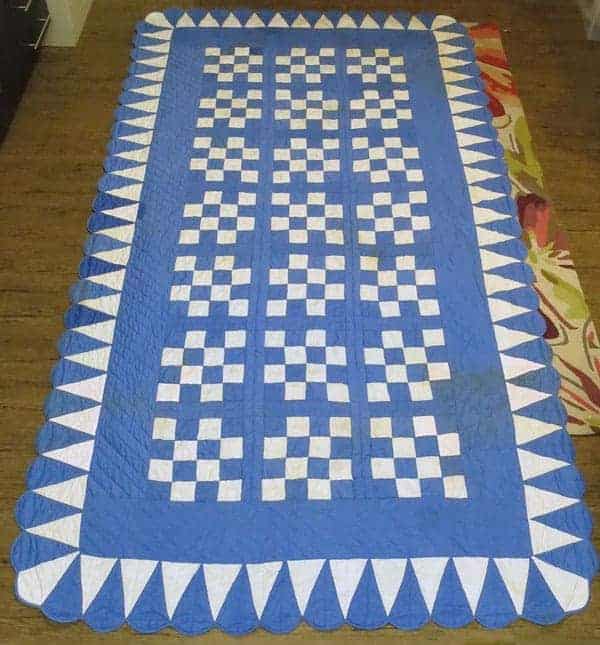
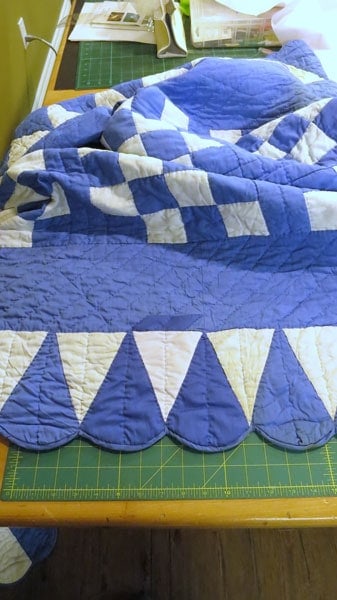
Fire-damaged quilt after repairs
I felt I must at least try to help salvage this quilt
My hope for this blog is to encourage any of you who might, in future, have a request made for your time and talent that seems difficult or impossible.
A devastating fire
Recently, late in October, there was a devastating fire in my area resulting in the tragic death of a young boy. Very little survived the fire but friends and neighbors had sifted through the rubble to find what was salvageable, and miraculously, when the rubble was cleared, this young boy’s quilt was found.
One of these ladies, Lori, started looking for somebody to repair the quilt.
Lori had done a little quilting herself, so she knew the local quilt shop owner and brought the quilt around to see if she might know of somebody who could repair it. The question was, should it be restored or stabilized? Should the damage still show or somehow be mitigated?
Lori went on to talk to the local quilt appraiser, but she didn’t know of anybody who did this kind of work. There was a woman across the border in the U.S. who quoted $1,400.00 for the repair. That option just wasn’t feasible. Lori called several other quilters, each time getting passed on to somebody else who might be able to help. Eventually she called me and left a message.
A Phone Message
Honestly, listening to her message, I was tempted not to call back. I had no experience with this kind of thing, I had no time. And quite frankly, I was afraid of that quilt and what it had been through.
I told Lori that maybe she should call our guild’s charity committee; maybe they could bring the quilt to the guild to show it. Perhaps seeing it, somebody would step up and tackle the project. We ended our phone conversation… I have never felt so terrible for saying no as I did that day. A profound sense of shame made me call Lori back. I asked her to bring the quilt over so I could at least have a look. Perhaps I could help out.
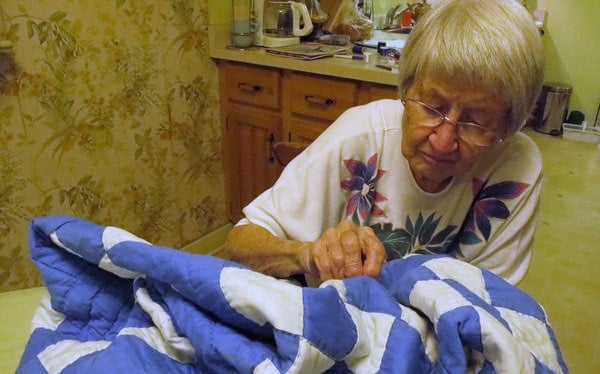
Lori pulled the quilt from a plastic bag and placed it on my dining room table. Although the quilt had been laundered several times it was still carrying an intense smoky perfumed smell. It was charred by falling beams, ripped where the rubble had been removed, and burned in places, but mostly it was intact.
One of my worries about repairing it had been matching the fabric. Coincidentally, it was done in the exact colors as a quilt my mother-in-law Estella Miller had made for my husband in the 1970’s. I took this as a sign that I should go ahead and tackle the repairs.
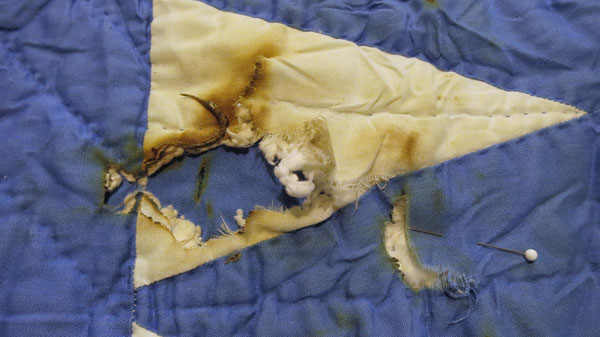
Lori marveled at how the quilt had survived the fire. I guessed that it was a polyester or polyester cotton blend which would likely ignite at a higher temperature than cotton. This was confirmed when I examined one of the burned holes and found a curved blob of melted polyester residue.
Examining the quilt, it became apparent that it would always carry the evidence of what it had been through. Nothing and nobody could make it all go away, but I was ready to try to help.
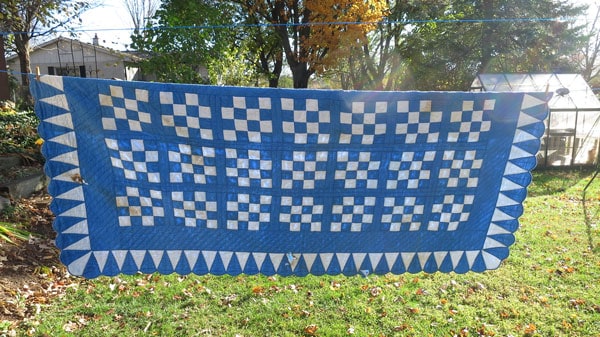
The first thing that needed to happen was to reduce the smell it carried. The next day was bright and breezy so I hung it up to air on our clothes line. It looked kind of happy out there flapping in the breeze. Fortunately, when the day was done, the smell was cut by about 50%.
The Repair Work Begins
Although the thought of mending this quilt was daunting, in the end the process was really not terribly difficult, even with my limited hand appliqué abilities. It was a time consuming process but one that, in the end, brought me a great sense of accomplishment and peace.
I had watched Judy Lyons, the local quilt appraiser, speak many times at our guild’s quilt shows. She had mentioned that the best way to repair worn areas was to either stabilize them with tulle, so that the original fabric still showed, or to find fabric of the same era, weave, color and design, and appliqué patches over the damaged areas.
The appliqué idea seemed the best especially after my mother-in-law, Estella, found a very close match to the blue fabric in her scrap bag.
I then visited our local fabric shop Fab Fabrics, who donated a couple of pieces of white polyester and poly cotton. I’d try both out over the burned areas to see which would cover the damage best. I could see that there would be some shadowing using either of the white fabrics. The poly-cotton blend was more opaque but I decided to use a bit of white fabric paint to cover the worst of the damage.
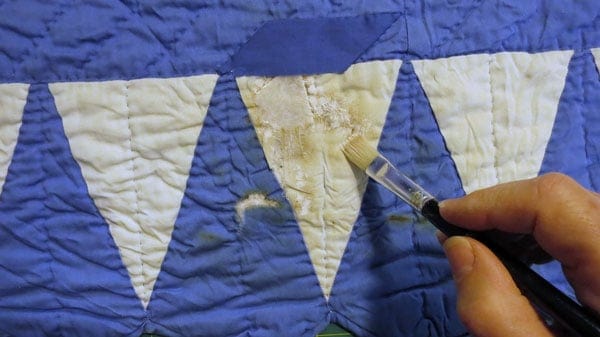
Cutting out the burned areas was not an option, for that would compromise the structure of the quilt. Some batting had also burned away. I used Misty Fuse ® to fuse new bits of batting in place inside the quilt.
How to Make the Appliqué Patches
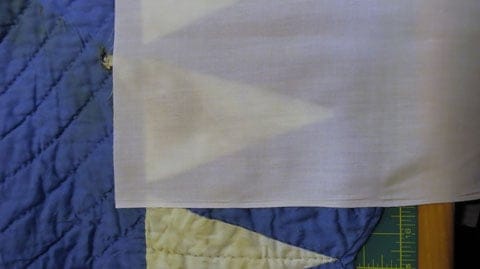
Most of the holes burned into the quilt were along the scalloped border. How would I make patches exactly shaped to appliqué over the damaged areas? The opaque polyester gave me the idea of using tracing paper. Placing the translucent tracing paper over the patch, I then traced around the shape using a ruler and pencil.
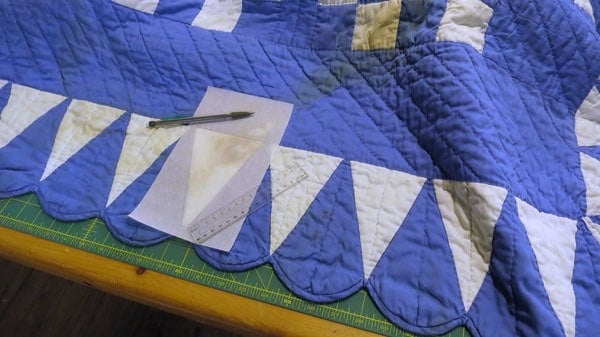
Some of the curved blue patches were also damaged. I could still see the edge of the binding through the tracing paper and was also able to trace around the curve for those pieces without too much difficulty. Then the paper was cut along the pencil lines and checked for accuracy by placing it over the damaged area again.
Next I placed the tracing paper face down on the wrong side of my fabric and trimmed the fabric leaving about 3/8 inch around for a seam allowance. You don’t see this in my picture, but I also trimmed the points of each corner back to reduce bulk.
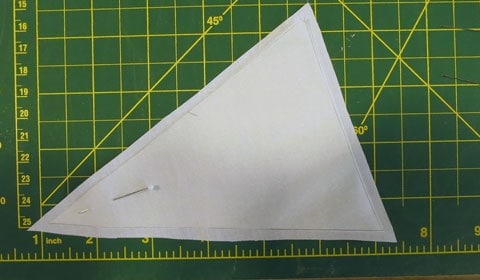
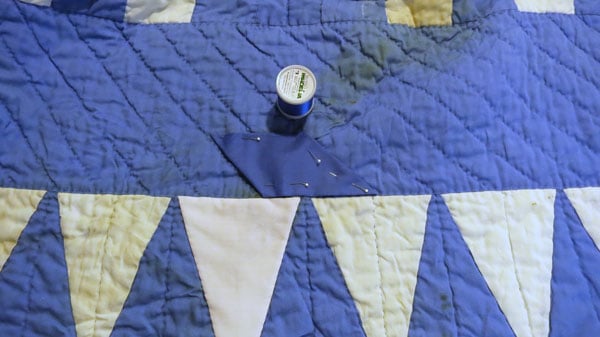
Using a glue stick, I first glued the points down onto the tracing paper using the edge of the paper as my guide. Then I applied glue to the side seams and stuck them to the paper. Some of the triangles on the quilt had points where others did not. I tried to always replicate the look of the quilt. For this process I used a Lapel Stick ® glue stick. I always made one patch at a time to be sure that the glue did not set too much.
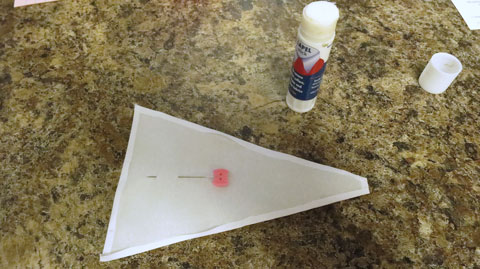
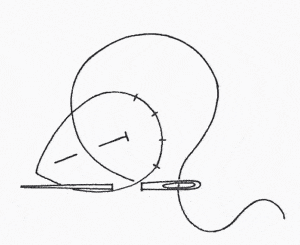
The patch was positioned with pins to the quilt and then stitched in place using a very fine matching silk thread made by Madeira ®. I liken the appliqué stitch I use to a ladder. You catch just a few threads of the patch going across the ‘rung’ of the ladder and then advance the needle between the layers for the sides of the ladder. Using fine matching thread is essential for making sure the patch looks like it ‘lives’ in the quilt and is not just plopped on top. It is also important to place several stitches in the corners to stabilize the patch for paper removal later.
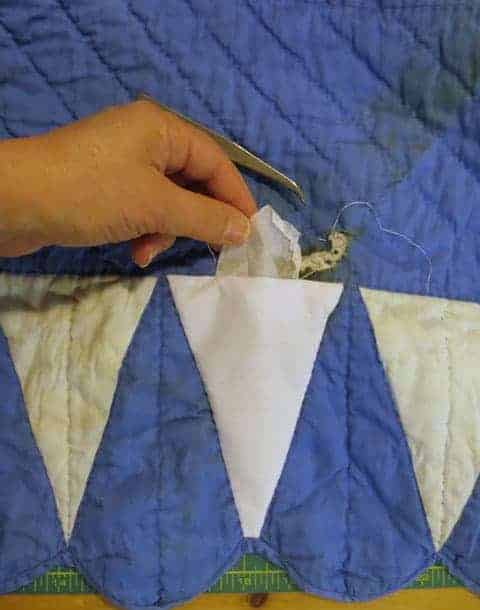
 Before sewing all the way around I left a 2 – 3 inch opening in the stitching. This was necessary for removing the tracing paper. As you can see I’m pulling it out here in the picture. Sometimes I used tweezers to pull out the bits in the corners. I would suggest sticking a pin through the layers at the very corners so as not to stress the corner stitching as you remove the paper. After this was done I finished my hand stitching to close the opening.
The same process was used to patch above the scalloped border. Keeping the patch to the shape of the quilting seemed like it might blend in best.
Once the white and blue scallop patches were repaired it was time to replicate the look of the quilting. I tried to keep my stitching the same as what the original quilter had done. In most cases my quilting went through the top and batting layer only, so as not to disturb the look of the original quilting on the back of the quilt. I also pulled my stitches to pucker them to match the look of the quilt.
There were a good number of the center squares in need of repair as well. Many of them were scorched and several were ripped.
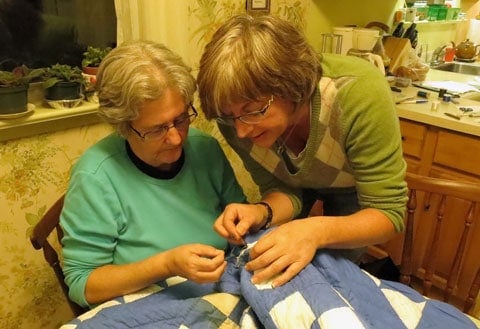
Even before I had initially been contacted by Lori, my sister-in-law, Laurie Black, had told me that when she was an Early Childhood Educator, she had cared for the little boy when he was a toddler. Perhaps having her put in a few stitches would help her deal with the tragedy. Laurie’s area of brilliance is caring for children, not hand sewing, but she really did a lovely job helping with one of the small patches.
Estella also wanted to help. She had heard that a grandmother had made this quilt. I could see it was important to her, as a grandmother, to have a small part in the project as well.
Deciding when enough repairs had been done was difficult. When I finished there were certainly areas that still showed visible evidence of the fire. Knowing that some damage can never be completely undone is hard to accept.There will always be things that we are unable to fix as hard as we might work or as much as we might wish. But there was a certain peace in trying.
I have a quilt made by my mother many years ago that is very badly damaged by fire. It is a star quilt with about a dozen stars burned and several where the batting is pulled to the top when the globs of plastic were pulled off. I don’t know if it is too damaged to try to repair. It is made from scraps from our feed sack dresses in the 50’s.
I’d like to send you pictures and get your input.
I’m sorry I missed your message Annette. I hope things worked out.
Annette Slate
My first question should have been Should I launder it first if I attempt to repair it.
If you think it will hold together. Try hand washing.
Hi Annette,
I probably would launder it first by hand, soaking it in a bathtub. Baking soda ought to help with the odour. It never does go away entirely though. Be very careful when laundering and lay the quilt flat to dry to avoid more damage. The quilt I worked on had been laundered by the restoration company involved in the fire prior to my receiving it. You can send me pictures at brenda@amongbrendasquilts.com
I’m so glad I found your post! My husband took some of our kids on an overnight camp out last night, and this morning my 7-year-old came home with burns on the baby quilt I had made for him. I was gutted. Still not sure why he took it camping in the first place! But at least now I have a plan of action for dealing with the holes and scorch marks so it can be enjoyed for a lot longer. Thank you!
Good luck. He probably needed a bit of home with him while away.